Sprung At Last

  • The Divorce
  • The Dating
  • Teen Tales
  • Dog Days
  • A Long Story
  • Cooking
You are here: Home / Archives for recipes

Pinolata (Pine Nut Cake)

05.29.2013 by J. Doe // Leave a Comment

Not long after her birthday, The Child gets sick – so sick, she has to back out of the school play, missing everything but the final performance, and then leaving before the cast party. When she recovers, we spend our evenings going over all her class assignments.

Did this get turned into math? Where are you on your science project? These are the questions I ask that fill her evenings.

It quickly becomes clear that she’s not just catching up on work she missed when she was sick, but perhaps a little bit from before she got sick … perhaps, quite a bit from then. I try to help her organize, and get back on track, but things keep popping up. She has to create a book cover for history class, she remembered. Oh! And also, she has to bring in food for class. In two days.

She’s pleased she remembered so far ahead of time. Roman food, she says. It’s for history class.

I wonder if this is my assignment or hers, but decide that her part of the assignment is probably complete now: she remembered to tell me before we got in the car to drive to school the day it was needed. I scan through my shelf and find two Italian cookbooks, my beloved Essentials of Classic Italian Cooking by Marcella Hazan, and another one, De Medici Kitchen, by Lorenza de Medici, now out of print, and which I bought for fifty cents at a thrift shop not long ago. (You can get used copies for not much on Amazon).

I start by looking for a recipe that says it’s Roman, but nothing pops out – at least, nothing that is suitable for a middle school history class toga party. So I fudge it a little, and settle instead on a simple Tuscan recipe that I think the kids will like, and which doesn’t involve refrigeration, unusual ingredients, or a trip to the store.

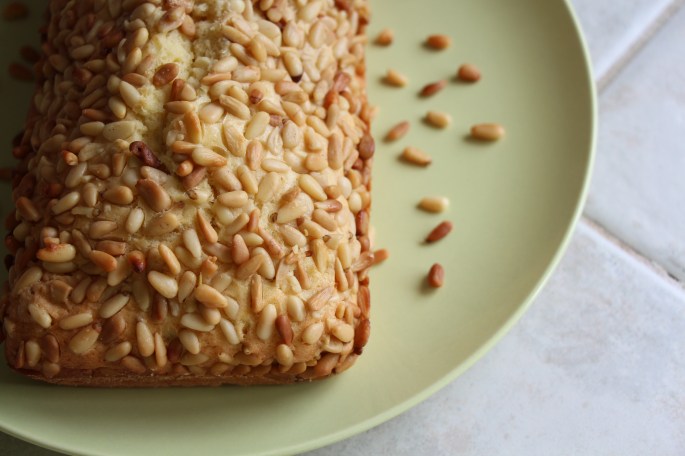
The Pinolata cake from De Medici Kitchen is incredibly simple – just a butter cake accented with pine nuts. I was surprised when I mixed all the ingredients and realized the recipe included no vanilla, cinnamon, or nutmeg. Just butter, flour, sugar – and not very much sugar at that. The resulting cake is a bit dry and very buttery tasting: The perfect thing to serve alongside a cup of coffee or tea, or to accompany fresh fruit.

I liked it so much that I hated to send it off to school for the kids, but send it I did. It’s simple enough to make any time I want more.

Pinolata


Pinolata (Pine Nut Cake)
 
Print
Prep time
20 mins
Cook time
40 mins
Total time
1 hour
 
Author: Lorenza de Medici
Ingredients
  • 1 ½ cups all-purpose flour
  • 1 tsp baking powder
  • pinch of salt
  • ½ cup unsalted butter, softened
  • ½ cup sugar
  • 3 eggs
  • ½ cup pine nuts
Instructions
  1. Preheat oven to 350 degrees (F). Sift together the flour, baking powder and salt in a bowl.
  2. In another bowl, mix together the butter and sugar until soft and fluffy. Add the eggs one at a time. Then add the flour mixture. The dough should be quite soft.
  3. Butter a loaf pan and dust with flour. Pour the dough into the pan and sprinkle with the pine nuts. Bake for 40 minutes or until toothpick inserted in the middle comes out dry.
  4. Remove from pan and cool completely on a rack before serving.
Notes
Another blogger who tried this recipe suggests mixing the pine nuts into the dough. I pressed them into the top, but found quite a few fell off and many got a rather brown, so if this is a problem, then mixing them in would be a nice solution.
Wordpress Recipe Plugin by EasyRecipe
3.2.1230


Categories // The Joy of Cooking Tags // baking, pine nuts, recipes

Chocolate Cherry Granola Bars

04.08.2013 by J. Doe // 4 Comments

Yes, yes, I know: These don’t sound like they’re on my diet – the one I swear I’ve started. They’re not for me, though, they’re for The Child.

Really.

We spent a week in Cannon Beach and it was interesting and insanely frustrating to watch her eat. I had no excuses for not cooking for her. I had the time, and we were staying in a rented condo with a perfectly well-stocked kitchen.

She ate fish and chips all week, except for the one night she ate pasta and the other night she ate pasta. If you can call it that. I call it Mac ‘n Cheese because that’s what it said on the box. I tossed in some frozen peas to ameliorate my guilt over feeding it to her.

I’m a good cook, but she just doesn’t like anything that isn’t on her very, very short list.

I let her eat lunch at school in the hopes that she would start eating what her friends do. Every once in a while, she comes home and tells me she tried salmon at school, or something with tofu, but the statement usually ends with “… but I didn’t really like it.” Her friends tell me she eats oatmeal for lunch nearly every day.

But a week away from home renewed my determination: I will cook for The Child, and not only will she eat it, she will enjoy it. Vacation is over today, so I made granola bars to put in her lunch. I figured if she’s eating oatmeal for lunch, she there’s a chance that she’ll eat oats that I cooked for her. And if she decides to trade for something else, at least one of her friends will let her know what she’s missing. Because these granola bars are made of oats and awesome.

I modified this slightly from a recipe I  found originally on Orangette, who modified a recipe she found over on Smitten Kitchen, who adapted her recipe from Ina Garten. Such is the way of internet cookery. This version of the recipe is all peanut-buttery goodness wrapped around gooey chocolate and chewy cherries. And oats, to sort of hold it all together.

Really, it’s more of a bar cookie masquerading as health food, but I can live with that …  if The Child eats it.

Chocolate Cherry Granola Bars


Chocolate Cherry Granola Bars
 
Print
Prep time
15 mins
Cook time
30 mins
Total time
45 mins
 
Author: Sprung At Last
Ingredients
  • 2 cups oats, divided
  • ⅓ cup to sugar
  • 1 cup pecans
  • ½ cup unsweetened coconut
  • ½ cup chocolate chips or chopped chocolate (any kind you like)
  • ¼ cup dried cherries, chopped
  • ½ tsp. kosher salt
  • ⅓ cup peanut butter
  • 1 tsp. vanilla
  • 6 Tbsp. unsalted butter
  • 6 Tbsp. agave syrup or honey
  • 1 Tbsp. water
Instructions
  1. Preheat the oven to 350°F. Lightly butter a 9-inch square baking pan. Cut a rectangle of parchment paper to line the bottom and two sides of the dish, leaving a little overhang. Press the parchment paper into the dish. Lightly grease the parchment paper.
  2. Put ⅓ cup of the oats in the bowl of a food processor. Process until finely ground.
  3. In a large bowl, stir together the remaining 1⅔ cup oats, ground oats, sugar, pecans, coconut, chocolate chips, dried cherries, and salt.
  4. In a medium bowl, whisk together the peanut butter, vanilla, melted butter, agave or honey, and water. Pour the wet ingredients over the dry ingredients, and stir well, until the mixture is evenly moistened. Transfer to the prepared pan, pressing the mixture firmly to ensure that it molds to the shape of the pan.
  5. Bake the bars for about 30 minutes, or until they’re brown around the edges and just beginning to color on top, too.
  6. Transfer the pan to a rack, and allow the bars to cool completely in the pan. When cool, run a sharp knife along the edges of the pan; then pull up on the parchment paper to lift the sheet of bars out of the pan. Cut the bars into squares.
Wordpress Recipe Plugin by EasyRecipe
3.2.1230


Categories // The Joy of Cooking Tags // chocolate, granola, recipes, snack

Hot Cross Muffins

03.31.2013 by J. Doe // 4 Comments

Growing up in Manhattan in the 1970s-80s, there were a couple of things we ate for breakfast on the weekends, neither of which my mother cooked because, well, my mother didn’t really cook much. On the weekend, she would send me out with some money and tell me to go pick something up and bring it home for breakfast.

The first goal was always bagels, from the local bagel shop – hubcap sized and smeared with cream cheese and lox. But the line for the bagel place was often out the door and that was on a good day: If you got there too late, the line was out the door and halfway up the street.

These days, I would get on that line and wait for one of those bagels, but back in the day I could get one any old day – I could even have one for lunch, since it was right near my school – so the line seemed hardly worth the trouble.

On those days, I would take the money to the supermarket and pick up something from Entenmann’s. Now, I know what you’re thinking: Entenmann’s? The ones on the supermarket shelf next to the Hostess chocolate-covered donuts?

Well, yes and no. The box was the same, sure. But the Entenmann’s that I grew up on was a family-owned company that baked their danishes and coffee cakes locally (the company was sold to General Foods in 1982). It was fresh and delicious and sometimes, just sometimes, I could get this one amazing thing: Hot Cross Buns.

They came in little packs of nine square buns, with a tic-tac-toe of frosting on the top and delightful little bits of citron hiding inside. I loved how flavorful and yet not-too-sweet they were. I was always a bit sad when I went on an Entenmann’s run and couldn’t find the Hot Cross Buns, which was more often than not; but then it was a pleasant surprise when they appeared again on the shelves.

Only as an adult did I discover the significance of the crosses on the buns, and realize that, yes, they were a seasonal item for Easter.

It made sense when it was pointed out to me.

Anyway, by the time I figured it out, Entenmann’s had changed somehow and though I couldn’t really put my finger on what was different about it, I started avoiding it. The crumb coffee cake – another favorite – lightened up and became less flavorful, less satisfying. I stopped seeing the hot cross buns at all, though possibly I just didn’t remember to look for them at the right time of year.

I’m not a bread baker, so I was pleased to find a recipe for Hot Cross Muffins in my King Arthur Flour Baker’s Companion. The taste of the original without all the effort of making yeast-raised buns, said the recipe, so I tried it.

I wanted them to be the best effort possible, to resemble my childhood treat, so I made some Candied Orange Peel a few days ahead, to use in lieu of the citron. I used very cheap oranges from Target’s produce department (perhaps not the finest produce department I’ve ever seen), and though they came out a bit small and sad-looking, they were quite flavorful.

The muffins were very close to the hot cross buns I remember from my childhood – perhaps not quite as light a texture as the original, but I think a bit of flour-sifting might resolve that issue. I loved all the plump raisins and sweet, chewy bits of peel. The frosting is dense and adds just the right touch of buttery sweetness to the muffins, which are not actually terribly sweet – meaning they were just right.


IMG_9494

Hot Cross Muffins
 
Print
Author: King Arthur Flour Baker's Companion
Serves: 12
Ingredients
Batter
  • 1 cup raisins
  • 2 tablespoons water
  • 3 cups AP Flour
  • 1 tbsp baking powder
  • ½ tsp salt
  • ⅓ cup sugar
  • ½ tsp cinnamon
  • ½ tsp ground nutmeg
  • ¼ tsp ground allspice
  • ½ cup candied citrus peel
  • 2 large eggs
  • 1½ cups milk
  • 1 stick (8 tbsp) butter, melted and cooled
Icing
  • 1¼ cups confectioners' sugar
  • 2 tbsp soft butter
  • 1 tsp vanilla
  • 1 tsp milk
Instructions
  1. Preheat oven to 400°F.
  2. Batter: Mix together the raisins and water in a bowl, and set aside.
  3. In a large bowl, whisk together all of the dry ingredients. Make a well in the center and add the raisins and citrus peel.
  4. Beat together the eggs, milk, and melted butter, then add to the dry ingredients all at once. Stir until everything is evenly combined.
  5. Scoop into 12 greased muffin pans (or use paper liners). Bake for 20-25 minutes until nicely browned and a cake tester comes out clean. Remove them from the pans and allow them to cool for 5 to 10 minutes before icing.
  6. Icing: Combine all the icing ingredients in a small bowl and beat till thick. Use a pastry bag and tip to pipe thick crosses onto the muffins. (If you don't have a pastry bag, fill a sturdy plastic bag with the frosting, squeezing it down into one corner. Snip the tip of the bag off, and squeeze the frosting onto the muffins.) I used a ziploc bag ... it works fine. Not elegant, but still plenty tasty.
Wordpress Recipe Plugin by EasyRecipe
3.2.1230


Categories // The Joy of Cooking Tags // holidays, muffins, recipes

  • 1
  • 2
  • 3
  • …
  • 11
  • Next Page »

Connect

  • Bluesky
  • Email
  • RSS
  • Substack

Subscribe to hear more from Sprung at Last

Loading

Top Posts & Pages

  • Momofuku's Ginger Scallion Sauce
  • Rhubarb Sour Cream Muffins
  • Blueberry Focaccia
  • Fannie Farmer's Banana Bread
  • Tuna and White Bean Salad

Recent Posts

  • Herbert Hoover’s Sour Cream Cookies
  • Ricotta, Lemon, and Blackberry Muffins
  • Deborah Madison’s Potato and Chickpea Stew
  • Richard Nixon’s Chicken Casserole
  • A Room at the Inn, Part 5

Tag Cloud

apples baking bananas beans biking breakfast candy cheese chicken child support comfort food cookies dating dessert divorce holidays Idaho IVF jdate kitchen disasters marriage match.com meat okcupid orange pasta pets pixels prozac random thoughts recipes reflections Seattle single single parenting snack soup The Alumni The Departed The Foreigner vegan vegetarian vintage recipes weekend cooking Wisconsin

About Me

If you’re just jumping in, you might have some questions, which I’ve tried to answer here.

Legalese

Legal information is here
Web Analytics

Copyright © 2025 · Modern Studio Pro Theme on Genesis Framework · WordPress · Log in