Sprung At Last

  • The Divorce
  • The Dating
  • Teen Tales
  • Dog Days
  • A Long Story
  • Cooking
You are here: Home / Archives for The Joy of Cooking

Baked Orecchiette with Broccolini

06.01.2013 by J. Doe // 4 Comments

We got some new neighbors last year, with two bouncy little boys, and The Child decided that maybe, since she’d outgrown the trampoline in our backyard, the new neighbors might want it. They did, and the father happily came to remove it, leaving a giant mud pit where it once stood. The Departed had put a layer of weed-preventing cloth under and around the trampoline, and lots of water had collected on top of it each winter, and once this was all removed, what was left was a crater of compacted mud.

I’d had ideas about putting a garden in that spot, but when I saw that crater, I thought, well, it’s back to the Farmer’s Market for me.

Lucky for me I have a wonderful lawn guy, and I showed him the pit, and asked, What do I do? He offered to build me some raised planting beds and fill them with good soil for gardening. All of this would simply go on top of the existing mess. So he built the boxes and filled them when they were done, the weather turned warm and sunny, and so The Child and I excitedly drove up to a Woodinville gardening store and loaded up on herb plants and heirloom tomato plants and zucchini seeds and beets and strawberries and you name it.  Everything we could think of to grow and eat – whether or not it was something we wanted to eat was besides the point. It would be amazing when it came out of our garden. We would like tomatoes if we grew them.

Things started off well enough – the plants all seemed happy enough at first, and the seeds sprouted nicely, and I got a composting system and gave myself a gardening education via youtube videos and Amazon product reviews. Things grew in ways I didn’t expect but I just rolled with it. Bean plants are climbers, apparently. I should probably have realized this before planting one, but instead I built it something to climb on, out of two stakes and some twine.

But then, Seattle changed its mind about spring, and the clouds rolled in, accompanied by a constant drizzle and chill. My basil plant turned yellow, and curled up to keep warm. My heirloom tomato plants bowed down in defeat.  I abandoned my dream of a freezer filled with a bounty of marinara sauce.

I started talking to the plants, mostly to apologize.

One plant held on gamely, though – thrived even: a rosemary plant. It hasn’t grown much but it still seems to be quite solid, and even better, fragrant. So I snipped two sprigs from it and made one of my favorite pasta recipes, Baked Orecchiette from the Lottie + Doof blog.

I’m ashamed to admit that though I’ve made this recipe many times, I’ve never used fresh rosemary in it, only dried. I hate paying all kinds of money for fresh herbs in the grocery store, and then only using a small bit and, usually, throwing the rest away. But now, I have fresh rosemary, whenever I want it. And after tasting this recipe, finally, the way it is meant to taste – well, if all I get out of my garden beds is rosemary, it still will have been worth the trouble.

This pasta dish is wonderful for being loaded with everything except meat: Cheese, veggies, and pasta make a hearty meal baked together. But I love it for the seasonings: the fennel, rosemary, and pepper, immediately call to mind Italian sausage – fresh and flavorful, and cooked this way, guilt-free. It re-heats well, too, so it makes a great lunch the day after you make it.

It’s more of a winter dish than summer – but at the moment, Seattle is a little more winter than summer, too.


Baked Oriecchette


Baked Orecchiette with Broccolini
 
Print
Prep time
20 mins
Cook time
20 mins
Total time
40 mins
 
I love this pasta dish because it has the flavors of Italian sausage without having any meat. It is a flavorful and satisfying meal.
Author: Lottie & Doof
Serves: 6
Ingredients
  • 1 pound orecchiette
  • 1½ pounds broccolini, trimmed and cut into 1-inch pieces
  • Olive oil
  • 4 garlic cloves, chopped
  • 2 tsp finely chopped fresh rosemary
  • 1 tablespoon fennel seeds, lightly crushed
  • ½ tsp red pepper flakes
  • Salt
  • ½ pound fresh ricotta
  • Grated parmesan
Instructions
  1. Cook 1 pound of pasta in salted water until extremely al dente, about 8 minutes. Lift the pasta from the water and drain.
  2. Using the boiling water, blanch the broccolini for a minute or so. Drain in a colander.
  3. Heat 3 tablespoons olive oil over medium heat. Warm the garlic in the oil, but don’t let it brown. Add the broccolini, rosemary, fennel seeds and red pepper. Lightly salt the greens, stir them around the pan, and turn off the heat.
  4. To assemble the dish, put the cooked pasta and cooked greens in a large bowl and mix gently. Add the ricotta and mix again.
  5. Butter a shallow gratin dish. Put the pasta mixture in dish and sprinkle generously with grated parmesan. Cover and keep at room temperature for up to several hours.
  6. Preheat the oven to 400°F. Shortly before serving time, bake the pasta for 15 minutes. Uncover and bake for 5 minutes more. Serve immediately.
Notes
The original recipe calls for broccolini, kale, or chard; I like the broccolini which picks up the spices nicely and has a sweeter flavor against the red pepper. I also cut the amount of red pepper flakes down from one full teaspoon - I didn't find it too spicy, but The Child did. A half teaspoon is still on the spicy side, but The Child will actually eat it. Finally, I swapped out the pecorino for some parmesan, mostly because I always have a big wedge of parmesan on hand. Both work fine, but the pecorino is a bit stronger, of course.
Wordpress Recipe Plugin by EasyRecipe
3.2.1230


Categories // The Joy of Cooking Tags // pasta, vegetarian

Pinolata (Pine Nut Cake)

05.29.2013 by J. Doe // Leave a Comment

Not long after her birthday, The Child gets sick – so sick, she has to back out of the school play, missing everything but the final performance, and then leaving before the cast party. When she recovers, we spend our evenings going over all her class assignments.

Did this get turned into math? Where are you on your science project? These are the questions I ask that fill her evenings.

It quickly becomes clear that she’s not just catching up on work she missed when she was sick, but perhaps a little bit from before she got sick … perhaps, quite a bit from then. I try to help her organize, and get back on track, but things keep popping up. She has to create a book cover for history class, she remembered. Oh! And also, she has to bring in food for class. In two days.

She’s pleased she remembered so far ahead of time. Roman food, she says. It’s for history class.

I wonder if this is my assignment or hers, but decide that her part of the assignment is probably complete now: she remembered to tell me before we got in the car to drive to school the day it was needed. I scan through my shelf and find two Italian cookbooks, my beloved Essentials of Classic Italian Cooking by Marcella Hazan, and another one, De Medici Kitchen, by Lorenza de Medici, now out of print, and which I bought for fifty cents at a thrift shop not long ago. (You can get used copies for not much on Amazon).

I start by looking for a recipe that says it’s Roman, but nothing pops out – at least, nothing that is suitable for a middle school history class toga party. So I fudge it a little, and settle instead on a simple Tuscan recipe that I think the kids will like, and which doesn’t involve refrigeration, unusual ingredients, or a trip to the store.

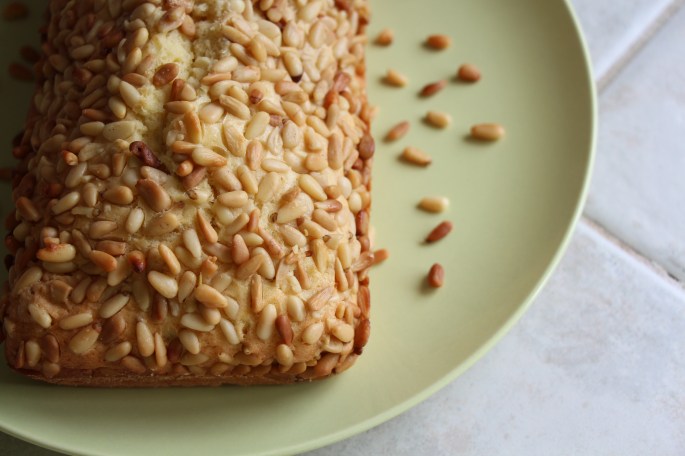
The Pinolata cake from De Medici Kitchen is incredibly simple – just a butter cake accented with pine nuts. I was surprised when I mixed all the ingredients and realized the recipe included no vanilla, cinnamon, or nutmeg. Just butter, flour, sugar – and not very much sugar at that. The resulting cake is a bit dry and very buttery tasting: The perfect thing to serve alongside a cup of coffee or tea, or to accompany fresh fruit.

I liked it so much that I hated to send it off to school for the kids, but send it I did. It’s simple enough to make any time I want more.

Pinolata


Pinolata (Pine Nut Cake)
 
Print
Prep time
20 mins
Cook time
40 mins
Total time
1 hour
 
Author: Lorenza de Medici
Ingredients
  • 1 ½ cups all-purpose flour
  • 1 tsp baking powder
  • pinch of salt
  • ½ cup unsalted butter, softened
  • ½ cup sugar
  • 3 eggs
  • ½ cup pine nuts
Instructions
  1. Preheat oven to 350 degrees (F). Sift together the flour, baking powder and salt in a bowl.
  2. In another bowl, mix together the butter and sugar until soft and fluffy. Add the eggs one at a time. Then add the flour mixture. The dough should be quite soft.
  3. Butter a loaf pan and dust with flour. Pour the dough into the pan and sprinkle with the pine nuts. Bake for 40 minutes or until toothpick inserted in the middle comes out dry.
  4. Remove from pan and cool completely on a rack before serving.
Notes
Another blogger who tried this recipe suggests mixing the pine nuts into the dough. I pressed them into the top, but found quite a few fell off and many got a rather brown, so if this is a problem, then mixing them in would be a nice solution.
Wordpress Recipe Plugin by EasyRecipe
3.2.1230


Categories // The Joy of Cooking Tags // baking, pine nuts, recipes

Orange Grilled Salmon

05.01.2013 by J. Doe // 1 Comment

The Child is away this week on a school trip. She packed herself, working from a packing list that she printed herself from her school’s website; she did her own laundry as needed. She put up a to-do list on her bedroom wall, for everything she needed to get done the day before the trip:

•Pack for trip
•Do math homework!
•Clean room
•Relax a little!

I dropped her off at school on Monday, where she unloaded her bag from the car herself and headed straight for the bus without so much as a backward glance. It’s what she did on her first day of first grade, too: the only picture I have of her first day of school is of her backpack as she boarded the bus.

I always thought those parents who call their kids back to get a goodbye hug or kiss were a bit, well,  needy, but on Monday, I unhesitatingly became one of them.

I’m enjoying the time to myself, and I’m getting all kinds of little things done that I don’t usually have time for. Still, there’s a strange emptiness hanging around me all week.

On Tuesday, I went to the library to pick up another cookbook  (Bouchon Bakery – because all the baking books are suddenly available now that I’m on a diet). Driving there, I saw a North Carolina license plate, and had nobody to pinch because I saw it first. Driving home, I was able to play my own music, which never happens two drives in a row and felt so strange that I finally just switched the radio to one of her stations and listened to some song I know the words to yet can’t stand.

I had the idea that while she was gone, I’d spend the week making things for dinner that I can’t usually make because she won’t eat. You know: meat. Instead, I stared into the freezer for a while and finally yielded to the impulse to make something that she likes, something would make it feel more like she was here.

This recipe for Orange Grilled Salmon originally came from Cooking Light magazine, and it’s decidedly easy: It’s just a rub that you put on the salmon right before tossing it on the grill for a few minutes. It’s got a nice orange flavor from the zest, sweetness from the sugar, and a spicy kick to it that isn’t overwhelming. It’s supposed to make enough for six salmon filets, but I like to put a lot on, so I find it’s enough for four. The nice thing is that you can make the rub ahead of time and just put it on when you’re ready to go – or you can make it, use it on one or two pieces of salmon, and store the rest for another day.


Orange Grilled Salmon


Orange Grilled Salmon
 
Print
Author: from Cooking Light
Serves: 6
Ingredients
  • 2 Tbs brown sugar
  • 1 tsp chili powder
  • ½ tsp grated orange rind
  • ½ tsp ground cumin
  • ½ tsp paprika
  • ¼ tsp salt
  • ¼ tsp ground coriander
  • ⅛ tsp black pepper
  • 6 salmon fillets
Instructions
  1. Rub mixture over fillets. Grill for about 8 minutes, turning halfway through.
Notes
If you are cooking for fewer people, you can make the rub, and store the leftover rub in an airtight container to use later.
Wordpress Recipe Plugin by EasyRecipe
3.2.1230


Categories // The Joy of Cooking Tags // fish, orange, salmon

  • « Previous Page
  • 1
  • …
  • 31
  • 32
  • 33
  • 34
  • 35
  • …
  • 47
  • Next Page »

Connect

  • Bluesky
  • Email
  • RSS
  • Substack

Subscribe to hear more from Sprung at Last

Loading

Top Posts & Pages

  • Blueberry Focaccia
  • Alice Waters' Roast Chicken & Herbs
  • Momofuku's Ginger Scallion Sauce
  • Rhubarb Sour Cream Muffins
  • Old Witch's Magic Nut Cake

Recent Posts

  • Herbert Hoover’s Sour Cream Cookies
  • Ricotta, Lemon, and Blackberry Muffins
  • Deborah Madison’s Potato and Chickpea Stew
  • Richard Nixon’s Chicken Casserole
  • A Room at the Inn, Part 5

Tag Cloud

apples baking bananas beans biking breakfast candy cheese chicken child support comfort food cookies dating dessert divorce holidays Idaho IVF jdate kitchen disasters marriage match.com meat okcupid orange pasta pets pixels prozac random thoughts recipes reflections Seattle single single parenting snack soup The Alumni The Departed The Foreigner vegan vegetarian vintage recipes weekend cooking Wisconsin

About Me

If you’re just jumping in, you might have some questions, which I’ve tried to answer here.

Legalese

Legal information is here
Web Analytics

Copyright © 2025 · Modern Studio Pro Theme on Genesis Framework · WordPress · Log in